


Since the <code>.env<code> file is not under version control, it often happens that developers are missing new values, added by other developers, when they pull the latest version. Also the <code>.env.example<code> is often totally out of date, because the team forgot to add new values to it. That's a pain, when a new developer joins the team and tries to set up the project. Laravel offers a default to all env function calls, but thats often not enough. Sometimes you really want to make sure a env variable exists and the developer explicitly defines a value for it. Often <code>.env<code> files get shared around, sent via email or something like that. But this is not really a generic and solid solution. Best would be, if the <code>.env.example<code> would just stay up to date! Let's try to configure some githooks to ensure our <code>.env<code> and <code>.env.example<code> will never ever be outdated anymore!
To compare <code>.env<code> and <code>.env.example<code> files, we'll use a github package called envy, a great package developed by the awesome guys from worksome!
composer require worksome/envy --dev
php artisan envy:install
Now make sure <code>.env<code> and <code>.env.example<code> are listed in the environment_files variable in the <code>config/envy.php<code>
'environment_files' => [
base_path('.env.example'),
base_path('.env'),
],
We need to add some git hooks to our repository. But since the whole <code>.git<code> directory (which contains the default git hooks directory used by git) is also not under version control, we need to create a new directory, which we can add to git, cause for sure we want to share our hooks with the whole team!
cd myproject; mkdir .githooks
The idea is to tell git to compare the both env files before one tries to commit and also after somebody pulls new changes. That means we need to add two git hooks, the <code>pre-commit<code> and the <code>post-merge<code> hooks. So if one tries to commit and forgot to add a new env variable to <code>.env.example<code> an error occurs and also after somebody pulls, and a new variable was merged to <code>.env.example<code> the developer gets notified that he/she should add this variable to his/her <code>.env<code> file.
touch .githooks/pre-commit; touch .githooks/post-merge
Since we use the same script in the <code>pre-commit<code> and <code>post-merge<code> hook, we add a new folder <code>.githooks/scripts<code> and put there the script which we then call inside both hooks (make sure to make them all executable with <code>chmod +x<code>).
mkdir .githooks/scripts; touch .githooks/scripts/envy-check
Now paste the following code to your envy-check script
Call the <code>envy-check<code> script inside your <code>pre-commit<code> and <code>post-merge<code> hooks (make sure your hooks and the envy-check scripts are executable).
nano .githooks/pre-commit
nano .githooks/post-merge
Paste the following content:
-----------
#!/bin/bash
./.githooks/scripts/envy-check
There is one problem left... Just adding a <code>.githooks<code> directory and add there, some script does not tell git to use these. Therefore we create a <code>.gitconfig<code> file and add the following lines:
cd myproject; nano .gitconfig
-------
[core]
hooksPath = .githooks
Now to make sure that git is using our defined <code>.gitconfig<code> we need to make some configuration. For this purpose there is noting better than a good old <code>makefile<code>. Just append these lines to your existing makefile or create a new one:
nano Makefile
-------
enable-git-hooks:
git config --local include.path ../.gitconfignano .githooks/pre-commit
^
make sure to use a real tab indent here - important!
The make package should be on quite every linux-based OS, but if it's not installed on your system, go ahead and install it with <code>sudo apt-get install make<code>.
Now the only thing you need to do is tell your team and new joining developers to run this one-time command: <code>cd myproject; make enable-git-hooks<code>
Basically all default env vars which are maybe not predefined in the default <code>.env<code> file are getting excluded. Just check the exclusions array in the <code>config/envy.php<code>. If you for some reason also want to exclude some env vars, just list em here. Also notice, that envy as default only checks env vars in config/*.php, which is the best practice location to put your env vars. Actually you should not use env vars directly in the code, cause of caching issues.
Now lets asume you worked on a new feature which introduces a new env variable called <code>FOO<code> which is used in some of your config files. You finally finished the feature and want to commit, but forgot to add the env varbiable to <code>.env.example<code>. You type <code>git commit -am "New Feature"<code> and greate you cant commit and you get notified that some vars need to be added to .env.example:

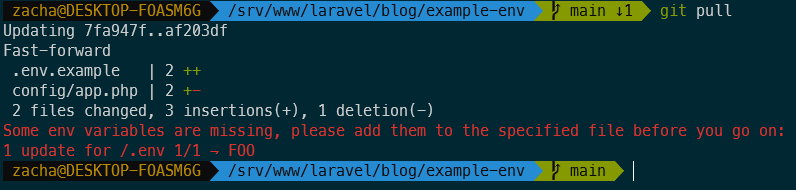
Also in reverse, if now a other team members pulls the lates code (he will not have the <code>FOO<code> env variable set), he gets notified, that there is a new env variable and he/she should define it in the .env.
The rich text element allows you to create and format headings, paragraphs, blockquotes, images, and video all in one place instead of having to add and format them individually. Just double-click and easily create content.
A rich text element can be used with static or dynamic content. For static content, just drop it into any page and begin editing. For dynamic content, add a rich text field to any collection and then connect a rich text element to that field in the settings panel. Voila!
Headings, paragraphs, blockquotes, figures, images, and figure captions can all be styled after a class is added to the rich text element using the "When inside of" nested selector system.
<code>test123<code>
<span style="color:red;">asdfasdf</span>
composer require spatie/laravel-artisan-dispatchable


